
Hi my name is Nickie and this is my new dressmaking blog.
I have returned to sewing after having a few dabbles at it in the past. My mum was a tailor before she retired, and she showed me the ropes when I was little. I also had a year of textiles class at school. I’ve made a few things since – mainly fancy dress things for my hubby and I. See my early Instagram grid for my proudest fancy dress make of Mexican outfits for the two of us. I also self-drafted a Smee outfit (not photographed) for my hubby once, years ago, using a tshirt of his – I actually have less confidence to do that kinda thing now, than I did then. I just did it without thinking about it, whereas I worry I’m going to mess it up nowadays.
I think I’ve only been able to go back to it with a renewed purpose after having my son, who has taught me all about the world of being patient..! I definitely needed that lesson when it came to sewing.
Nowadays, I rather enjoy the mindfulness and being present in the moment, that comes with sewing. I love big 1,000+ piece jigsaws for exactly the same reason – but hey, you don’t get to swan around in something pretty afterwards with a jigsaw, do you?
So I started in earnest after spending a day at the Great British Sewing Bee Live event in London late last year. My friend Sarah introduced me to some of her wonderful sewing friends, who I now stay in touch with on Instagram and who are just lovely, and I filled the empty rucksack I had taken with fabrics, patterns and dreams of my sewing future.
I thought in this first post that I would catch you up to the present day, by showing you what I’ve made so far. Then any subsequent blog posts will be brand new shiny clothes. Well… hopefully they won’t be shiny, haha.
I’ve also made some curtains, but I might post separately about those. I might finish hemming one of them soon too….
 Tilly and the Buttons – Miette
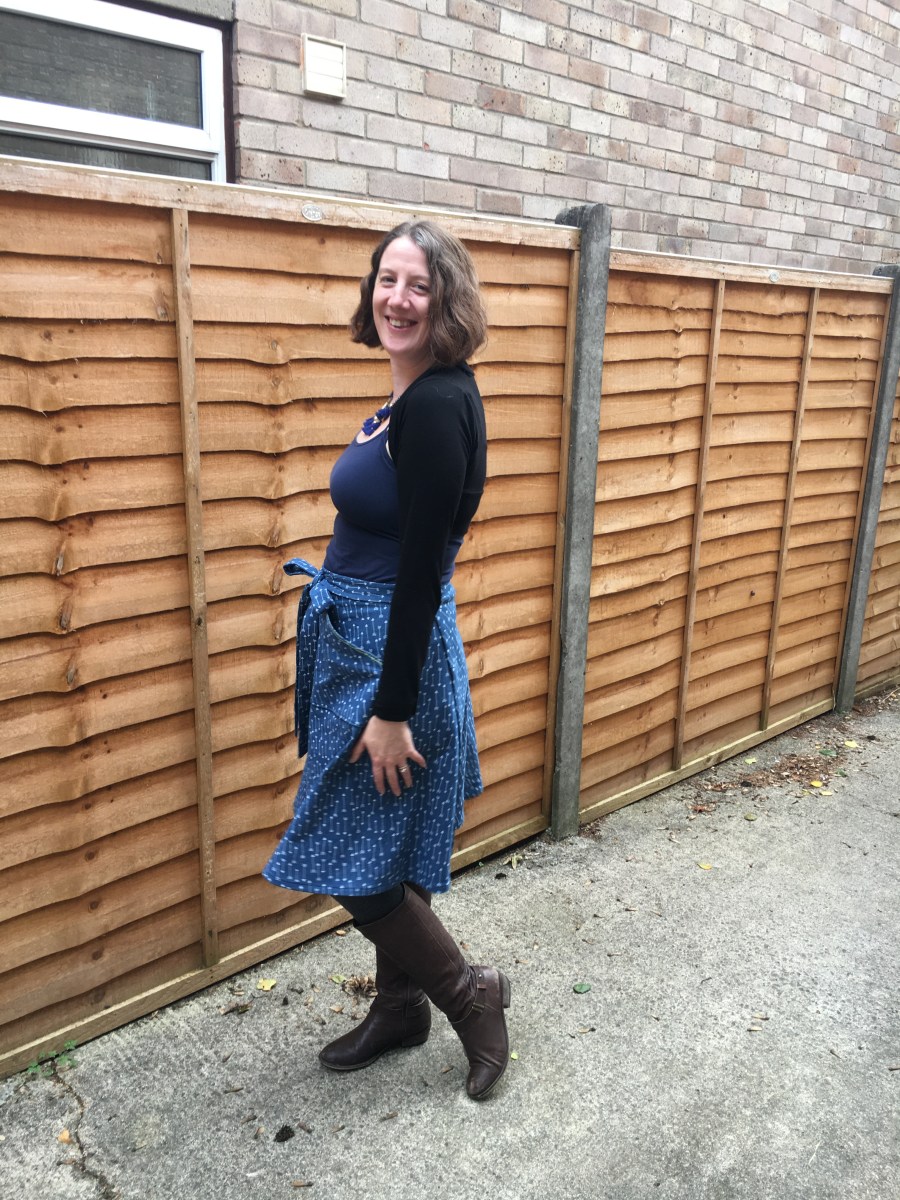
The pattern I was excited to pick up at the Sewing Bee was the Miette skirt by Tilly and The Buttons. I had decided on this before I went to the show, so went rifling through their patterns and found it straight away when I found their stall. This is such a great beginner pattern, because there are no zips or buttons. Just one little buttonhole to pass the waistband through.
I also loved it because the waistband can be tied nice and firmly, and I have a classic soft post-baby tummy that needs a bit of taming.
I really enjoyed adding a bit of a flair with a patterned lining to the patch pockets and a funky coloured zig-zag topstitch, just to make it unique to me. That’s another thing about sewing your own clothes – you’re the only person in the universe with that exact garment.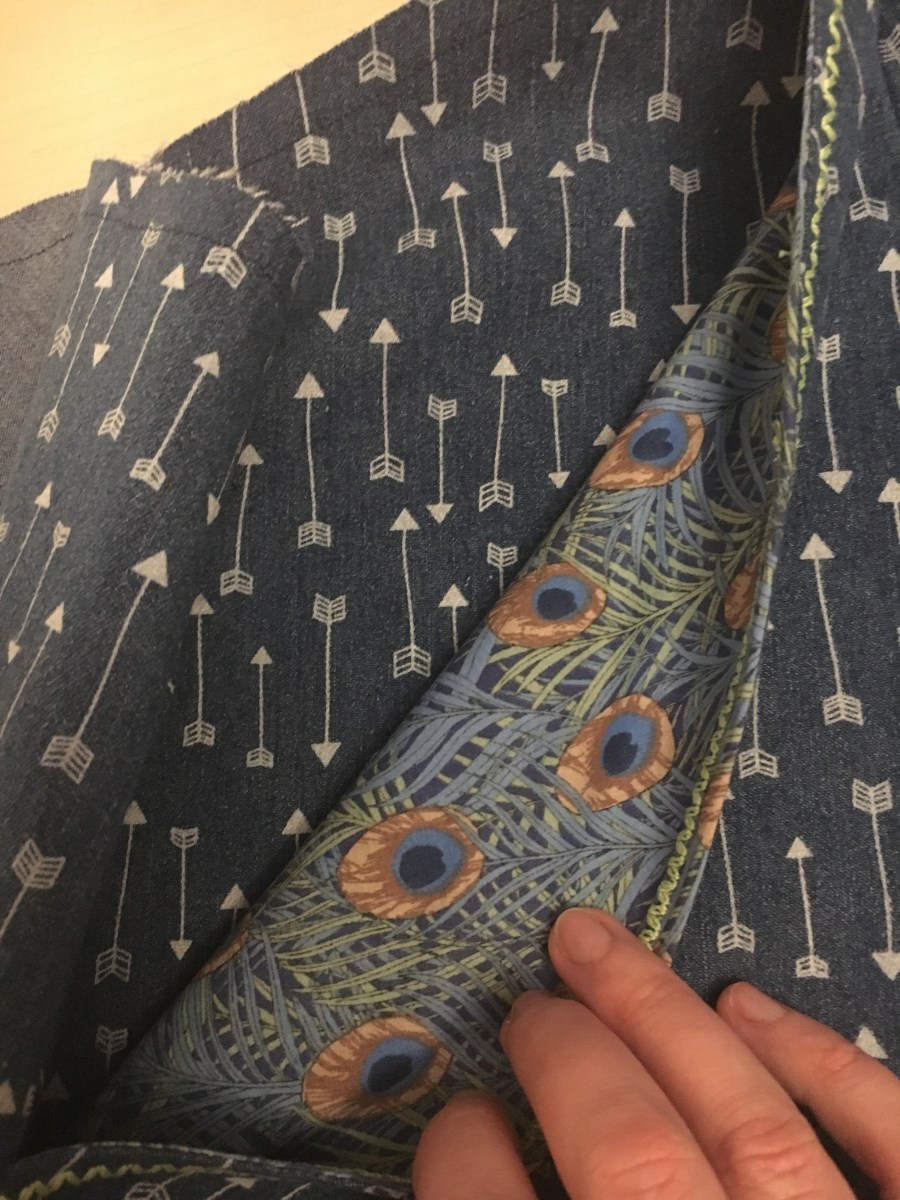
I think the only challenge I faced with this was that a needle broke at one point, and I didn’t immediately twig that this was the issue, and I kept trying to press on regardless. As soon as I realised, then it was plain sailing again. All part of getting back on the horse, huh?
I wear it all the time, it’s my trusty old faithful, and it’s softening and ageing as denim often does, but it actually makes it less lampshadey, so it hangs even more naturally now. Plus a lady at work saw me wearing this one day and asked if I’d lost weight. When you’ve made something to fit you properly, you appear more in proportion, so people think your body shape has changed. I was grinning for ages after that compliment.
 Simplicity 8342
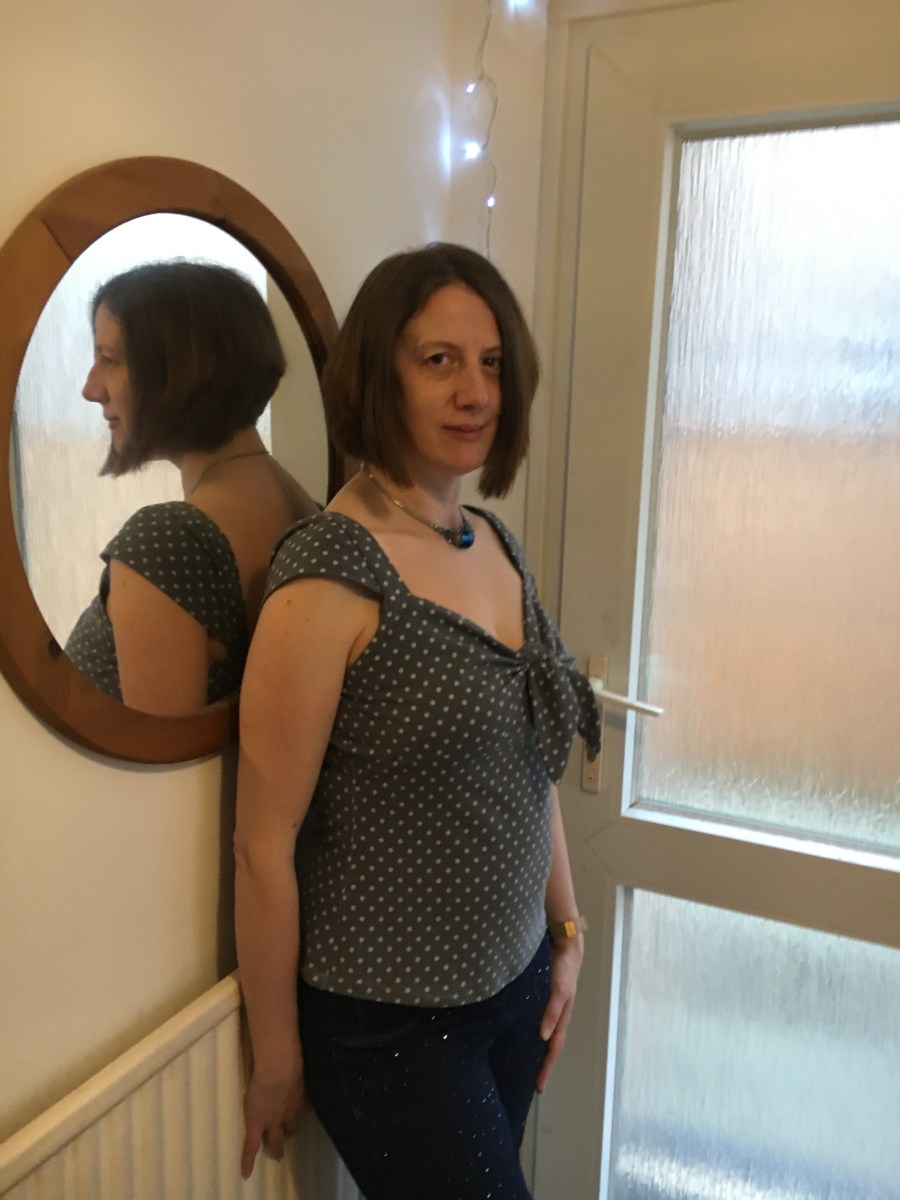
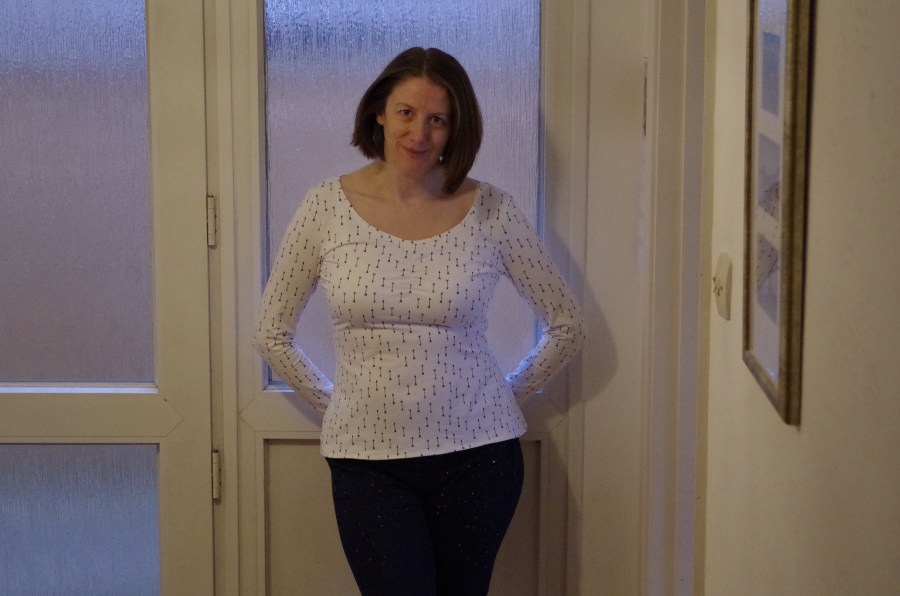
The next thing I made was at New Year, and I’d researched this one. I’d bought the grey jersey at the Sewing Bee, without really knowing what to make it into. I tend not to buy fabric first, too much, because I really don’t want a big stash of fabric lying about not being made into something. Do you ever have one of those To Do lists that things on it never gets done and it eats away at you? I get that and it’s not a good feeling.
So I looked at it one day and decided polka dots needed to have a 50s feel to it, and probably be a top. I looked and looked and then found the pattern online. I then noticed that Abi at Crafty Pinup had made a Youtube video sewalong. So I really quickly made this with her help, and I know there was a slightly tricky bit with the cap sleeves, sewing them when they already want to pull round in a half moon shape. I think without just seeing her handle it, and pull it around a bit, I would have stumbled and got scared off, or sewn it together and caught the pieces inside, which you couldn’t do without messing it up.
I was feeling pretty rough with the onset of flu at the time (hence slightly tired looking pics), but I was so chuffed with it. Another I wear regularly, in fact I’m writing this blog while wearing it.
One thing I will say about it is that the little cap sleeves are kinda precariously perched on my little shoulders a bit. I find I’m often rearranging them. I wouldn’t say they’re too big per se, just right, but easily pushed off by a cardigan or hangbag strap. It’s a small issue and it looks fantastic. 🙂
 Nina Lee Kew
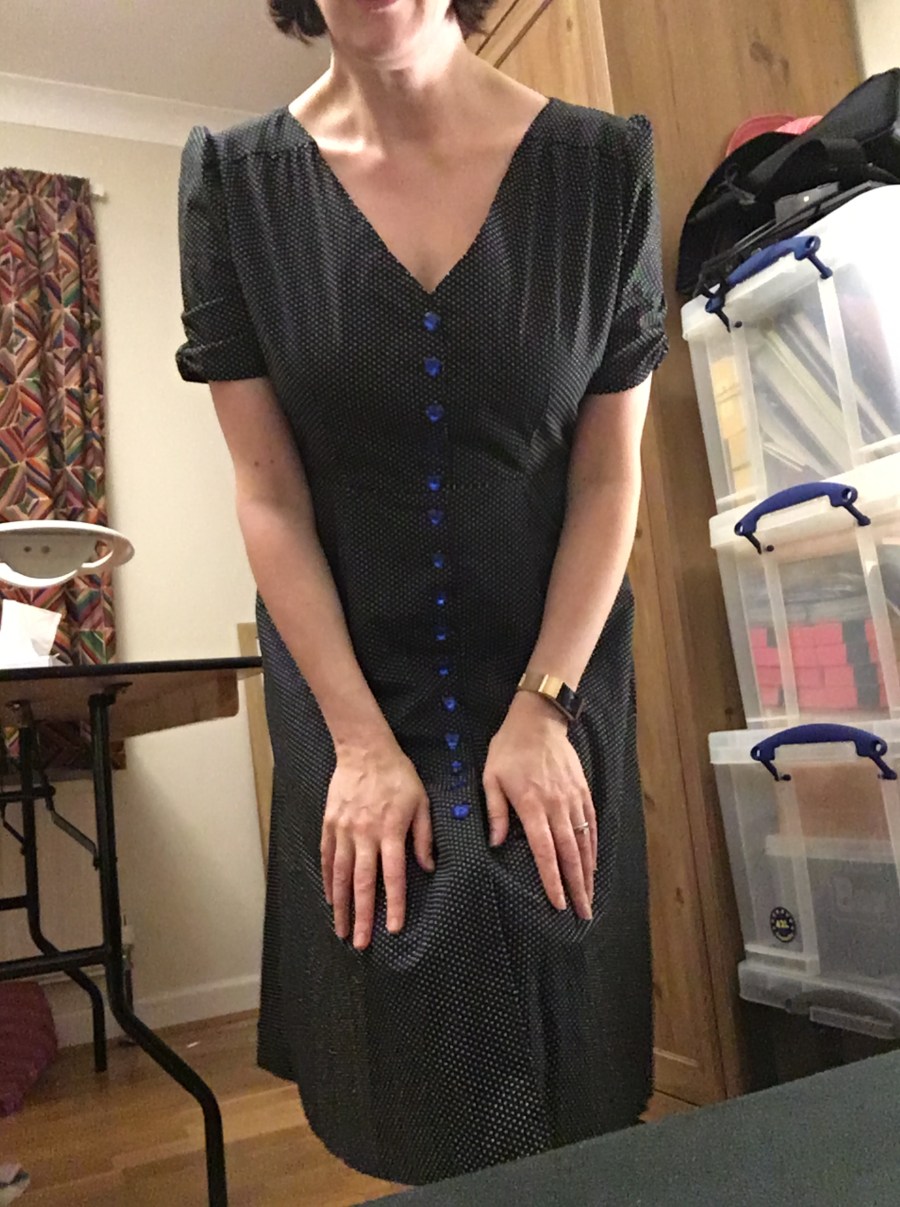
I had intended to start making this before the 50s top, but the fabric I bought turned out to be a bit narrower than I had thought, so I got spooked. Then when I had my confidence boost from the 50s top, I decided to just grab the bull by the horns and see if I could manage it. As it turned out, I could rearrange everything and still get everything cut properly, without needing to grade down the width of the skirt.
What I realised as I was making this was that my fabric choice was a bit amateur, as it was fairly straightforward cotton, and you really need to pick something a bit more drapey, like a lawn, or something with a rayon content perhaps – the dress wants to flow and flutter in the breeze. I can’t say this one quite does that.
However, this has become a dress I actually think works great for me, as an office dress, so it’s not a complete loss. I guess some would call it a wearable toile.
I really want to return to this sweet pattern with some lovely summery fabric soon, once I’ve got a few other plans out of the way, and the wretched weather cheers up. It felt really easy to put together, so I know that with some really beautiful fabric, I’m going to love it even more.
 Colette Myrtle
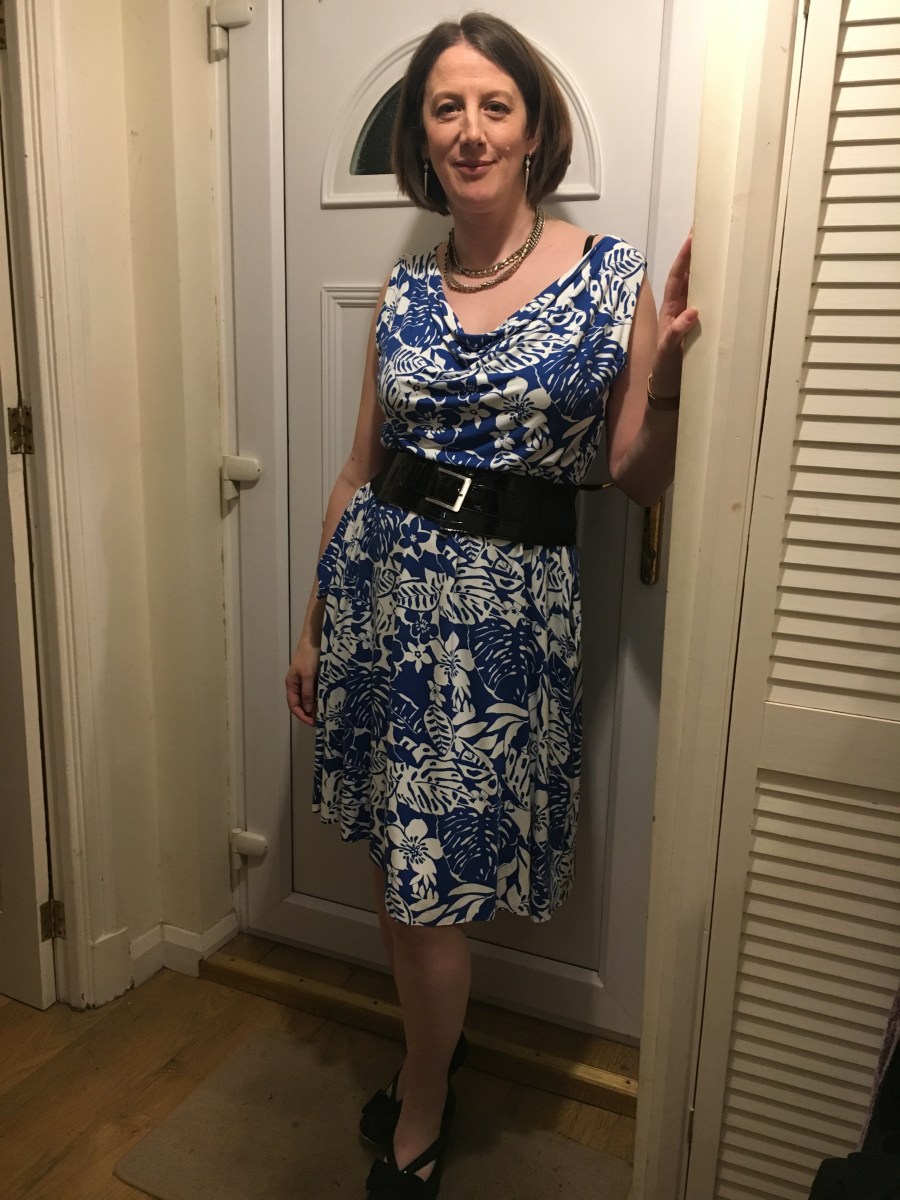
Oh my party piece. This is just divine. The day before the pattern arrived in the post (I had the download too, but their packaging – oh!), I had the Fabric Friday email from Sew Over It, and they introduced this blue and white jersey called Isola. It was love at first sight, so when the pattern arrived the following day, I got straight online and ordered the fabric too. Then when the fabric arrived, it is honestly the softest, loveliest jersey fabric you could ever hope for.
But my goodness, I didn’t half faff about with it and make silly mistakes. This was because I was just too darned excited and wanted to make it NOW!! The waistband flummoxed me a bit. I understood what they wanted to do, but I felt like it was using up bodice length, and using up skirt length, to wrap around the elastic. I suspect the longer version of this in their photos has been lengthened from their original pattern length, as I was trying to get it well past my knees, but it isn’t that long. That, or the model was very short. I ended up doing a simple elastic casing that I looked up on YouTube. I do have to revisit the dress when I get a minute though, because what their waistband casing did was hold the elastic flat against the body, so that it didn’t roll around in its casing.
So I want to just put some little catch-stitches along the width of the elastic at each side seam, just to hold it a bit. I also still need to hem it, even though I wore it to a party already hehehe. But I’m conscious I’m either going to need a friend to help check it’s level, or invest in a dress-form, which is kinda on my mind anyway…
My husband put his hand on my waist at the party and said “Ooh! This is very soft!” I know, thanks I made it! And it has pockets! hehehe. Incidentally, the photos and little Boomerang I had taken were at the party I mentioned, and I didn’t realise the right hand pocket was turned inside out. It was a good look!
 Tilly and the Buttons – Agnes
So the other pattern that I grabbed at Sewing Bee Live was the Tilly and The Buttons Agnes top. Who doesn’t have this in their collection, right?
I bought the fabric at the show too, from Higgs & Higgs. I really enjoy Tilly’s instructions as she talks about all the finishing that you need to do, to make it really neat looking and finished well. So I was super proud of how my cuffs and neckline looked.
I had a go at the ruching on the front of it too. It was funny because I did a couple of tests on a scrap of fabric, and although the first one I’d pulled the elastic aswell as the fabric, so it didn’t ruche up (is that how you spell it?!), the second time worked a charm and looked way better than expected. So I figured let’s get on with it… Two attempts on the proper top both resulted in the elastic being pulled with the fabric, so I unpicked them and was starting to make holes in the jersey by this point. Third time around, it ruched enough to juuuuuust about work, although the test version was much better. So I had to concede that this was as ruched as it was going to get. It still has a nice little shape to it.
I would say that this is a great wardrobe staple and I’ll probably make one or two others at some point, but I kinda like tops to be a bit more quirky and funky looking. I’m a bit of a pear shape, so hide, play down or choose shapes carefully for the bottom half, then make a fancy fuss of the top half and show off the girls. Therefore redressing the balance. Which is why I love cowl necks and the low cut 50s top. This is all absolutely personal choice, and it’s not to diminish the Agnes though. It’s a great top.
 Sew Over It Cowl Neck dress
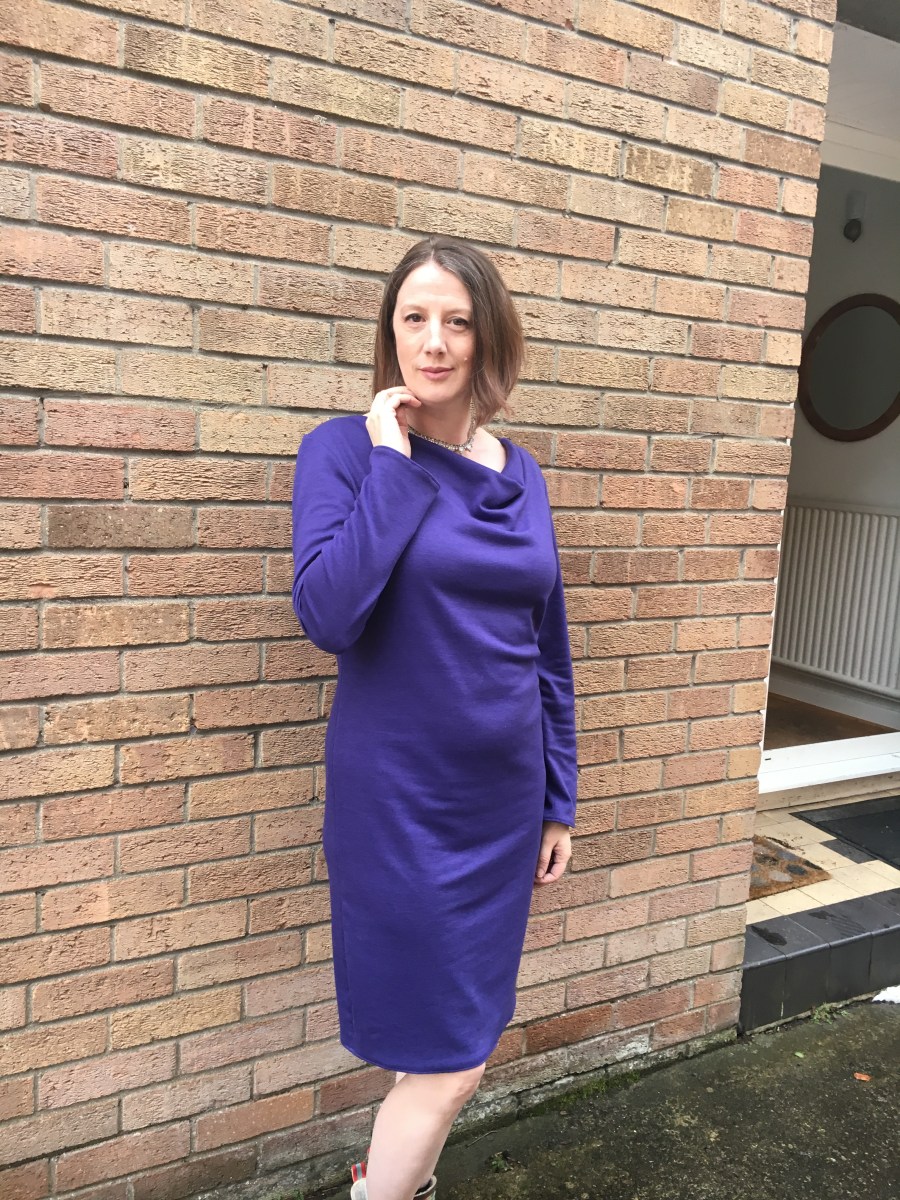
(Check out the wellies just peeping into this photo – it was freeeeezing that day!) So after my love affair with the Myrtle, I actually posted on Instagram that this dress needed to be one of my next makes. As it turns out, I had bought some purple ponte di roma from Evesham Fabric Shop, thinking of another pattern I have, but in the end realised that needed a bit more stretch than ponte. Then I read the Sew Over It pattern and it actually recommended ponte. Woohoo, win-win!
This was beyond easy to put together. 3 pattern pieces, front, back and sleeves. I’d already decided when making the Agnes that I wanted to give myself nice long sleeves. I’ve got slightly longer than average arms and I see a lot of 3/4 length sleeves and shrink at the thought. It takes me back to being this height at 14, and feeling long and gawky and everything being too short for me, especially as we were often in hand-me-downs or jumble sale clothes, when mum wasn’t making clothes for us. So I love me a long sleeve!
I want to have a go soon at grading between sizes on patterns, because I could have easily done a size down on the top half, with still keeping the skirt wide enough for my hips. As it happens, I just wear a slip under this and it prevents the skirt hugging (and therefore highlighting) my hips too much. But the top half could be slightly smaller for my shape.
That said, I wear this to work EVERY WEEK! It just blows everything else I wear to work out of the darn water. Whereas my Myrtle dress is being kept for nice evenings out (which don’t happen often as a mum), this dress is going to be worn to death. I adore the colour big-time and it just looks so swish in the office. I strut around feeling like a fancy lady. 🙂
 LAVitaly Azur Top
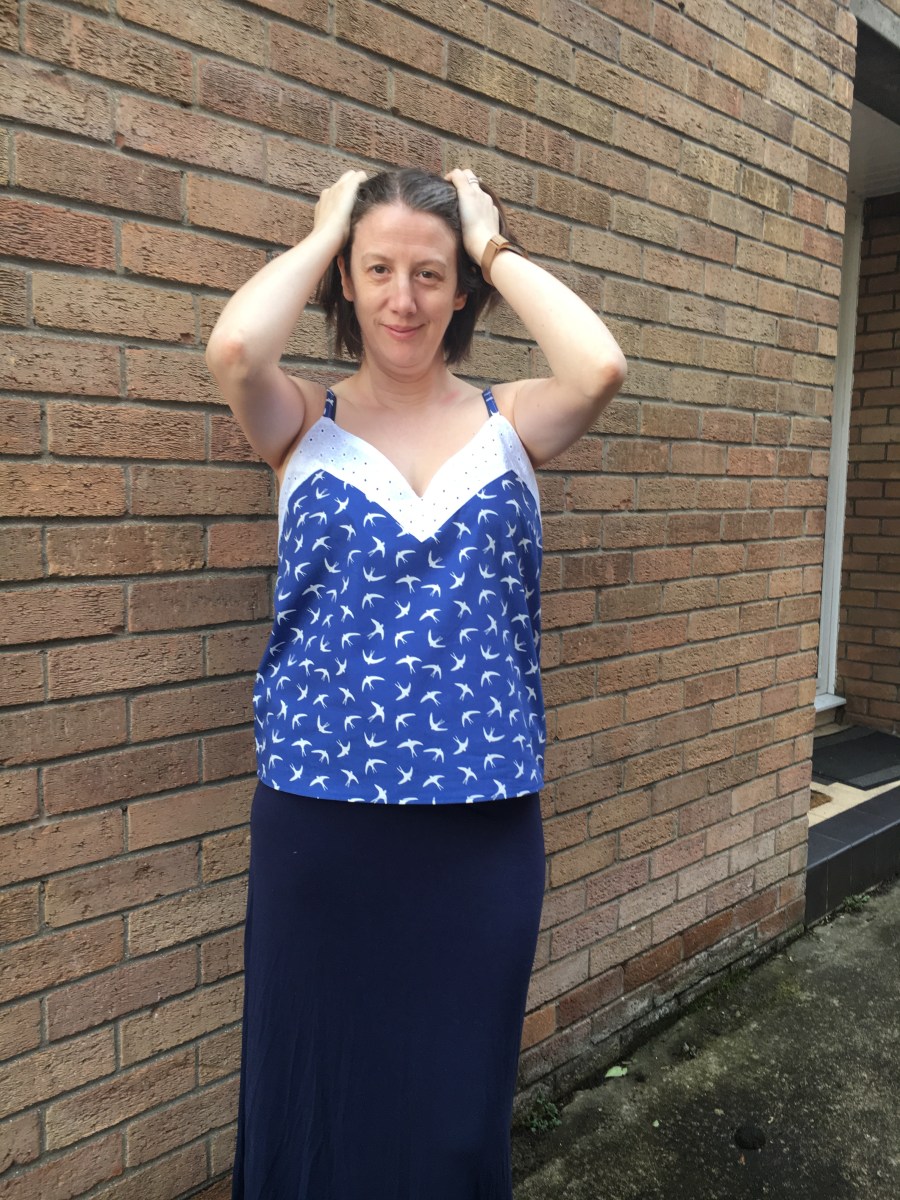
So about a year ago, I made an attempt at starting to sew, but got spooked by another project. However I did buy a handful of patterns online via Etsy. This pattern was one of them, and it was calling to me. I’d been to Flo Jo Fabric shop in my home town of Bristol and bought a teal cotton and also a blue cotton with white birds on it. Both of which I made into the Azur. The teal one was first and I was still feeling a bit rough from this flu I’d had, so wasn’t really concentrating and put the additional panels on the inside, instead of the outside. I also realised once I had put it on that I probably could have gone down a size or two from what I’d chosen.
So with the blue one, I sized down one size, and the fit was still a bit big on the bust, but was sitting right on my hips (pear shaped problems). So the lovely Lucia at LAVitaly actually did a little video for me and others on Instagram, which I’ve saved down, and it’s a How To on adding width to the hips, so that you can take the top down another size. I had visions of having to do a bust adjustment, which looks more complicated to lil ole me. I’m so grateful for the lovely community on Instagram, and how you can be in touch directly with the designers and suppliers. Makes it so much more enjoyable for what is otherwise a quite solitary activity.
So what I think I’ll do is leave the blue one as it is, it’s lovely and I can still wear it. But the teal one was all kinds of inside out anyway, so I’ll deconstruct it and see if I can re-use the pieces with a sized-down hip-adjusted version, because the fabric is just sweet as anything.
 Simply Sewing Magazine Drape Top
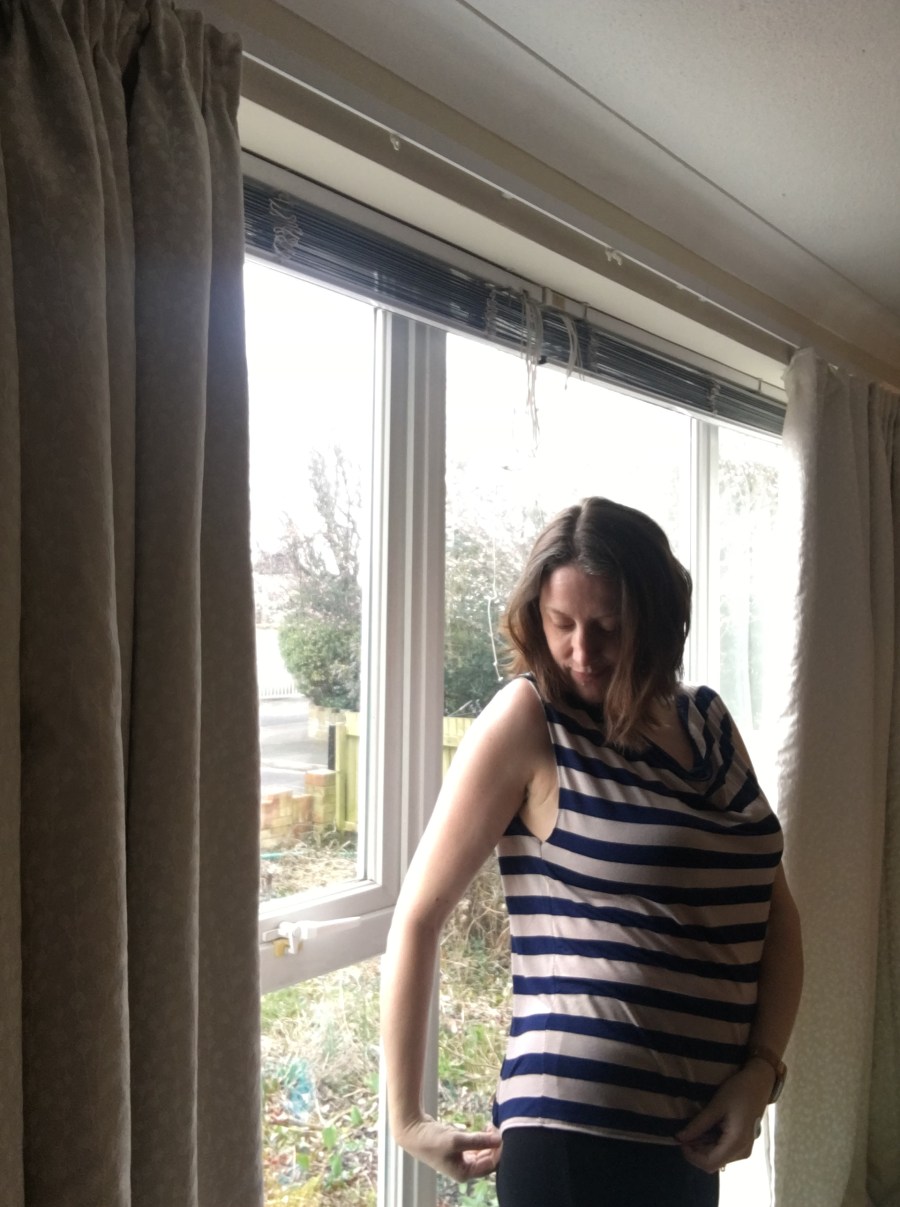
I’m altogether sure that this is my favourite top so far. It’s just SO effortless to wear and yet has a really dressy shape, even with casual looking fabric. It came with Issue 40 of Simply Sewing Magazine. So this first version I’ve made was in a stripey jersey that I bought from Sarah when she had a destash sale. Man, that sale was fast-paced – if you took a few seconds to think “hmmm, that’s nice, what could I make with it? Do I want it?” then you were just too darn late! 🙂 It was Mother’s Day and it couldn’t have been more perfectly timed, because I was ‘allowed’ to sit in bed waiting for the next fabric to be posted up. Great laugh.
So the top itself is just two main pieces, front and back. But the arm holes and neckline are both edged with binding strips cut from the same fabric. I found this a bit of a learning curve, and I couldn’t quite work out why once I’d done the neck binding, the parts where the front and back shoulder join together were a bit of a different size. I probably didn’t turn enough of the main piece under with the binding or something. I want to work that bit out, and perhaps talk to them about it, to work out where I’m going wrong, because I want to make more of these. A lot more.
OOOH, my first attempt at matching the stripes on the pattern of the fabric too and it went pretty well actually. What I did when cutting was to mark on the pattern for the front piece where the stripes were, then just temporarily move the pattern piece to where I was laying out the back piece, and check that the stripes were going to do the same thing there. Normally you would line up both pattern pieces side by side, but I didn’t quite have the width on the fabric, because it was from Sarah’s stash. So I was cutting one further down the fabric from the other. Very proud of giving that a go – starting to get back to not overthinking it, just doing it and seeing how it turns out. The best way to learn really.
You have to trace this pattern, because the two pieces are on the same sheet of paper, overlaid on top of each other. And up to then, I’d found tracing to be the fiddliest of things to do. They say necessity is the mother of invention, and I figured I have a nice big window in my sewing room. So I blu-tacked the pattern to the window, blu-tacked some plain paper over the top, so I could see through it with the light beaming through, and there you go, tracing heaven! Plus, tracing and standing upright at the same time – what’s not to love?! Of course, days later, Sarah coincidentally posts a really neat and easy YouTube video on how to trace things quickly. Typical.
Since making the stripey one, I’ve made a grey one from some more Sarah destash fabric. But I wore it out the evening I made it, before taking any pictures (should have taken some when I was out, but it was all about friend time for me). Then I grabbed a late night bit of supper, spilt it down myself, cos I’m a clumsy auf, and even though I rinsed it immediately, washed it and Oxy-actioned it, the stain is still there a bit. You can’t really tell when I wear it, because it’s on the folds of the cowl neck bit, but you just know, don’t you? Then, because I’d been so keen on seeing how it was doing, in the wash, I put it through the tumble dryer, and the seams have pulled a bit. Must have slightly shrunk it and pulled on the thread as it’s being tumbled around with everything else. Very delicate jersey it would seem. It’s still wearable, but I shan’t photograph it, it’ll be a casual one I just wear around the house.
I do have just about enough of the grey fabric to make another one though, so when I’ve got a few other things out of the way, I shall go back to that, cos the grey looked amazing on, looked so dressy with a sparkly necklace to go with it.
So if you’re still reading this, then thank you and thank goodness I’ve not bored you to tears yet. 🙂
I may write about all the projects I have lined up for the next month or two, because I think it will help structure them in my mind and get me motivated to start some of them. I’m racking up too many ideas at the moment, and it can actually become a mental bottleneck, can’t it?
We shall see…


Welcome to blogland! I’ve enjoyed sewing clothes in the distant past but now I can’t get away from cross stitch, knitting, patchwork, crochet… and then there’s always the crafts I haven’t tried yet. Too little time 😉
LikeLike
Thanks so much. I’m also slowly making my way through a Stitchsperation cross-stitch at the moment. Have you heard of them? Check them out – really modern funky designs. There is simply not enough crafting time in the world is there? Nowhere near enough.
LikeLike
I haven’t heard of them. I’ll go and look. I’m a big fan of Ink Circles designs.
LikeLike
I love how your Colette dress turned out! I tried that same pattern, but I was VERY new to sewing knits! It was, ah…interesting! Yours is sooooooo lovely! So are all your makes! I think it is wonderful your Mom was a tailor! My mom never taught me to sew. But she always encouraged me to try anything! This is my first year blogging too! Many great folks here to inspire, encourage, and admire your work! 🙂
LikeLike